For this example, we'll be creating a simple sales management for a ticketing office named ACheapSeat. The application allows buying of tickets for a particular event in a given venue. For this example, let's have tickets for three (3) venues: Cowboy Stadium Tickets, Ringling Brothers Circus Tickets, and Kyle Field Tickets.
First, create the database named acheapseat in MS SQL Server. (I'm using MS SQL Server 2005 Express edition).
Create the following tables:
1. Venues
Id: int, PK, Auto-increment, not null
Name: varchar(50), not null
2. Events
Id:int, PK, Auto-increment, not null
Description: varchar(50), not null
DateTime: timestamp, not null
VenueId: FK, int, not null
Price: numeric
3. TicketSales
Id: int, PK, Auto-increment, not null
DateBought: timestamp, not null
EventId: FK, int, not null
QuantityBought: int
Now, we can start with our C# application. I'm using C# express 2008.
1. Create a new Windows Forms Application. Let's name the project: ACheapSeat

2. We'll be using just one form. The name of the initial form is Form1. Let's rename it to ACheapSeatForm. Change the text to "A Cheap Seat Ticket Sales Management"

3. Add a TabControl to the form. It should have 3 tabs: Sales, Venues, and Events (rename the tab into "tabMain"). Change the tab's anchor property to Top, Bottom, Left, Right.

4. Add a button to the lower right of the form. Name this button as btnClose and change its text to "Close". Change its anchor property to Bottom, Right
5. Go to the Venues tab and add a label, a textbox, a datagridview, and 3 buttons.
label: name: lblVenueName, text: Venue Name
textbox: name: txtVenueName
datagridview: name: grdVenue
button 1: name: btnAddVenue, text: Add
button 2: name: btnSaveVenue, text: Save, Enabled: false
button 3: name: btnDeleteVenue, text: Delete, Enabled: false


Change the DataPropertyName to the corresponding field in the database.
 Change the AllowUserToAddRows and AllowUserToDeleteRows properties of the grid to false

6. Go to the code view of the form and add the following:
using System.Data.SqlClient;
7. Add the following code to the constructor (the function that has the same name as its class):
cn = new SqlConnection("Data Source=RIXX\\SQLExpress;Initial Catalog=acheapseat;Integrated Security=SSPI;");
8. Let's add more codes:
9. Go to form view and select the tab control. Look for the SelectedIndexChanged event and doubleclick on it..

10. Add the following switch statement:
switch (tabMain.SelectedTab.Name)
{
case "tabSales": break;
case "tabVenues":
RefreshVenue();
break;
case "tabEvents": break;
}
//This will re-populate the grid with the database values, every time the user clicks on a particular tab.
11. Go back to form view and double-click on the Add button, and add the following code:
SqlCommand cmd = new SqlCommand(
"Insert into Venues(Name) values ('" + txtVenueName.Text + "')", cn);
cmd.ExecuteNonQuery();
RefreshVenue();

First, create the database named acheapseat in MS SQL Server. (I'm using MS SQL Server 2005 Express edition).
Create the following tables:
1. Venues
Id: int, PK, Auto-increment, not null
Name: varchar(50), not null
2. Events
Id:int, PK, Auto-increment, not null
Description: varchar(50), not null
DateTime: timestamp, not null
VenueId: FK, int, not null
Price: numeric
3. TicketSales
Id: int, PK, Auto-increment, not null
DateBought: timestamp, not null
EventId: FK, int, not null
QuantityBought: int
Now, we can start with our C# application. I'm using C# express 2008.
1. Create a new Windows Forms Application. Let's name the project: ACheapSeat


3. Add a TabControl to the form. It should have 3 tabs: Sales, Venues, and Events (rename the tab into "tabMain"). Change the tab's anchor property to Top, Bottom, Left, Right.

4. Add a button to the lower right of the form. Name this button as btnClose and change its text to "Close". Change its anchor property to Bottom, Right
5. Go to the Venues tab and add a label, a textbox, a datagridview, and 3 buttons.
label: name: lblVenueName, text: Venue Name
textbox: name: txtVenueName
datagridview: name: grdVenue
button 1: name: btnAddVenue, text: Add
button 2: name: btnSaveVenue, text: Save, Enabled: false
button 3: name: btnDeleteVenue, text: Delete, Enabled: false
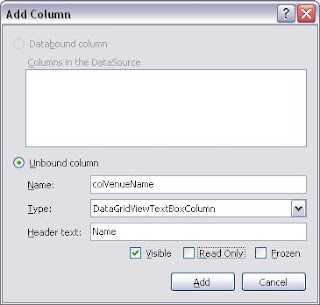
- Add the following columns to the grid: Id, Name


Change the DataPropertyName to the corresponding field in the database.


Also, set ReadOnly to True
6. Go to the code view of the form and add the following:
using System.Data.SqlClient;
7. Add the following code to the constructor (the function that has the same name as its class):
cn = new SqlConnection("Data Source=RIXX\\SQLExpress;Initial Catalog=acheapseat;Integrated Security=SSPI;");
//Change the RIXX\\SQLExpress to the name of your server instance. Some may have just "localhost"
8. Let's add more codes:
- Create a void function that will establish the connection to the database
void OpenConnection()
{
if (cn.State == ConnectionState.Closed)
{
cn.Open();
}
}
- Create a void function that will refresh the contents of the venue grid.
void RefreshVenue()
{
OpenConnection();
SqlCommand cmd = new SqlCommand("Select Id, Name from Venues", cn);
SqlDataAdapter adp = new SqlDataAdapter(cmd);
DataTable dt = new DataTable();
adp.Fill(dt);
grdVenue.DataSource = dt;
}
9. Go to form view and select the tab control. Look for the SelectedIndexChanged event and doubleclick on it..

10. Add the following switch statement:
switch (tabMain.SelectedTab.Name)
{
case "tabSales": break;
case "tabVenues":
RefreshVenue();
break;
case "tabEvents": break;
}
//This will re-populate the grid with the database values, every time the user clicks on a particular tab.
11. Go back to form view and double-click on the Add button, and add the following code:
SqlCommand cmd = new SqlCommand(
"Insert into Venues(Name) values ('" + txtVenueName.Text + "')", cn);
cmd.ExecuteNonQuery();
RefreshVenue();
//This will add whatever text you type on the textbox to the database
12. Go back to form view and click on the grid. Look for the CellClick event and double-click on it.

13. Add the following code:
txtVenueName.Text = grdVenue.CurrentRow.Cells["colVenueName"].Value.ToString();
// this will put whatever text is selected from the grid, to the textbox.
14. Add the following codes also:
btnAddVenue.Enabled = false;
btnDeleteVenue.Enabled = true;
btnSaveVenue.Enabled = true;
15. Go back to form view and double-click on Save and add the following codes:
SqlCommand cmd = new SqlCommand(
"Update Venues set Name='" + txtVenueName.Text + "' where Id=" +
grdVenue.CurrentRow.Cells["colVenueId"].Value.ToString(), cn);
cmd.ExecuteNonQuery();
RefreshVenue();
btnAddVenue.Enabled = true;
btnDeleteVenue.Enabled = true;
btnSaveVenue.Enabled = false;
txtVenueName.Text = string.Empty;
16. You can also do the same with the Delete button:
SqlCommand cmd = new SqlCommand(
"Delete Venues where Id=" +
grdVenue.CurrentRow.Cells["colVenueId"].Value.ToString(), cn);
cmd.ExecuteNonQuery();
RefreshVenue();
btnAddVenue.Enabled = true;
btnDeleteVenue.Enabled = true;
btnSaveVenue.Enabled = false;
txtVenueName.Text = string.Empty;
Repeat the steps with the other tabs and make sure that all fields are well represented.
Comments